Thursday, December 6, 2012

Magic Lemon Merinque Pie

Seriously guys, this is the perfect pie to whip up and take with you all to those holiday parties/dinners when you don't want to show up empty handed.  This pie is so simple to make and you only need a few ingredients!  I made it to take to my friend's house for Thanksgiving Dinner, and of course it was a hit! Try it, you'll love it and so will everyone else!


Adapted from Home Cooking with Trisha Yearwood-She's country y'all.  You know the gal can cook!

Ingredients:
Graham Crack Pie Crust
 -1 1/2 cups fine graham cracker crumbs
 -1/2 cup sugar
 -1/4 cup butter, melted

Filling
 -1 can (14 0z.) sweetened condensed milk
 -1/2 cup fresh squeezed lemon juice (I used about 2 1/2 lemons)
 -1 tsp. grated lemon zest
 -3 large egg yolks (save the whites for the meringue)

Meringue
 -3 large egg whites
 -1/4 tsp cream of tartar
 -1/4 cup sugar

Directions:
1. Preheat oven to 325 degrees
2. For the crust: In a mixing bowl, stir together the graham cracker crumbs and sugar until combined. Stir in the melted butter. Press the mixture firmly into a 9-inch pie plate.
3. For the filling: In a medium bowl, mix the condensed milk, lemon juice, zest and egg yolks.  Pour the mixture into the crust.

4. For the meringue: Beat the egg whites and cream of tartar in a medium bowl with an electric mixer until soft peaks form, then add the sugar and whip until peaks are stiff.
5. Spread the meringue over the pie and seal to the edge of the crust.
6. Bake until the meringue browns slightly, 15 to 20 minutes. Chill for at least 2 hours before serving.
7. ENJOY!!!!

Wednesday, October 3, 2012

Peanut Butter Doggie Treats

Peanut Butter Doggie Treats!


This is Willis. 

Willis was an only child before my boyfriend begged for a pitbull puppy.  I did not want another dog, but Nick said "Candace, my heart just felt different when I held that puppy."  How could I say no to that?  I couldn't.  So now Willis has a little brother.  They have become best friends. 


They do everything together.


Two peas in a pod.


How cute are they?


Cuddling.


I'm always baking for the loved ones in my life...so I figured it was time to bake for my little boys.

Peanut Butter Dog Treats

Ingredients:
1 1/2 cups whole wheat flour
1 1/2 cups white flour
1/2 cup peanut butter (all-natural or organic)
1 cup water
2 tablespoons oil

How to:
1. Preheat the oven to 350 F
2. ix oil, peanut butter and water
3. Add flour gradually forming a dough. Knead dough into ball and roll to 1/4 in thickness
4. Cut dough with bone shaped cookie cutters or cut the dough into strips
5. Place on an ungreased cookie sheet (I baked mine on wax paper over a cookie sheet)
 6. Bake at 350 F for 20 minutes
Icing is made from flour and water.

Snoop isn't little anymore...

Tuesday, October 2, 2012

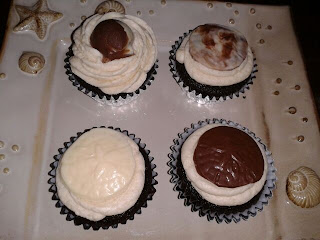
Chocolate Cupcakes with Coffee Liqueur Cream Filling and Coffee Buttercream

I made these bad boys to go along with the double vanilla cupcakes for Chad and Rebecca's wedding.  Seriously...what could be better than booze and cupcakes?  Exactly.

Try them.  I know you will love them.  They're like a party in your mouth.

As Chad's daddy said..."You gotta watch those cupcakes.  They have high test in them!"


I made the candies on top of the cupcakes using candy melts...perfect decoration for a beach themed wedding!


Adapted from Paula Dean

Ingredients:
2 1/4 cups all-purpose flour
2 cups sugar
3/4 cup unsweetened cocoa powder
1 1/2 teaspoons baking soda
1 teaspoon baking powder
1/2 teaspoon salt
1 cup vegetable oil
1 cup strong brewed coffee, cooled
3 large eggs
1 (8-ounce) container sour cream
1 teaspoon vanilla extract

How to:
1. Preheat the oven to 350 degrees 
2. Line muffin pans with paper liners
3. In a large bowl, whisk flour, sugar, cocoa powder, baking soda, baking powder, and salt. Add oil, coffee, and eggs. Beat at medium speed with an electric mixer until smooth. Mix in the sour cream and vanilla
4. Spoon the batter evenly into prepared muffin cups, filling each 2/3 full
5. Bake until a toothpick inserted in center comes out clean, for 16 to 18 minutes
6. Allow them to cool before icing
7. Cut centers of cupcakes out in a cone shape with a sharp knife or use a cupcake corer (I have one but it was lost in the black hole that I call my baking cabinet, it cores cupcakes super fast!) Set these pieces aside so that you can use them to cover the filling
8. Insert Coffee Cream Filling into the cupcake (this can be done by putting the cream into a piping bag with a small tip)


9. Cut the tops off of the pieces that you removed from the center of the cupcake in order to cover the cream filling, like so...


10. Ice the cupcakes and ENJOY!

Coffee Buttercream Icing:

1/2 cup butter, softened
3 cups confectioners sugar
1/4 cup strong brewed coffee, cold


In a medium bowl, beat the butter at medium speed with an electric mixer until creamy. Gradually add the confectioners' sugar, beating until smooth, then gradually beat in the coffee.

Chocolate Coffee Cream Filling:

3 oz. package cream cheese, softened
1/4 cup coffee-flavored liqueur (I used Kahlua. One air plane bottle is the exact amount you will need.)
1 (8-ounce) container frozen chocolate flavored whipped topping, thawed

In a small bowl, whip the cream cheese at medium speed with an electric mixer until smooth. Slowly add the liqueur and fold in the whipped topping. Cover and chill.


Friday, September 14, 2012

Double Vanilla Wedding Cupcakes

A slice of cake never made anyone fat. You don't eat the whole cake. You don't eat a cake every day of your life. You take the cake when it is offered because the cake is delicious. You have a slice of cake and what it reminds you of is someplace that's safe, uncomplicated, without stress. A cake is a party, a birthday, a wedding. A cake is what is served on the happiest days of your life.” ~Jeanne Ray 


I am one of those who cries at weddings.  Even when I attend weddings as a "plus 1" for people I don't really know, I cry.  I'm such a loser.

My friends' Chad and Rebecca were married last weekend.  You know Chad and Rebecca, they are the couple with the cute little boy who I made the Elmo and Cookie Monster cupcakes for.  Remember?


Anyway, I made cupcakes to dress up the cake table.  They were so cute and soooo delicious!  They looked absolutely perfect placed around the cake!  I was pleased.


My nickname is now "cupcake".  I'm okay with "cupcake".  Let's face it.  I have been called worse....


I made a vanilla cupcake with this Icing .  I definitely recommend that you try it.  It's A.M.A.Z.I.N.G!  And it would be good with a chocolate cake also! 


I used candy melts to make the little shells and sand dollars placed on the cupcakes.  I was pleased at how they turned out!


Here's the happy couple!  And Cavern enjoying his third Cupcake!


This was such a beautiful ceremony!  And yes, I cried....of course I cried. 

I had to share this picture of Kaden during the prayer.  How adorable is this picture?


And this is Kaden and I before the wedding and after he lost his first tooth! 


 Ok, I'm getting off subject.  Later!

Friday, September 7, 2012

Monster High Skullette Cupcakes

I know that I have been MIA.  I am working full time and also doing an internship for an additional 21 hours a week and taking a class at VCU.  I have no time for baking much less blogging.  The bright side...I graduate December 8th!  I haven't had a cupcake since the summer semester started and it seriously depresses me. 

I made these cupcakes a couple of months ago, but have had no time to share them with you guys.  Finally, here they are!

I received two invitations for birthday parties for little girls turning five around the same time.  Both were having Monster High Birthday parties.  I have to admit, I had no freaking clue what the hell Monster High was.  For those of you who do not know them, meet the Monster High girls...


My friend Ashley asked if I would make Monster High cupcakes for her daugther's birthday and sent me a link to Mighty Morgan's blog over at Mighty Delighty.  I was flattered..but SERIOUSLY doubting my ability to make these cupcakes.  Ashley served as my little cheerleader making statements like "I know you can do them" and "you're the best".    How could I say no to that???  Flattery will get you EVERYWHERE!

I had NO IDEA what I was getting myself into!  These were very time consuming and hard to make but I understand Makenna really enjoyed them!  And Oh.Em.Gee how cute are these?!?!  I really tested my abilities with these!  Check em out!


Ok, so I know they are not perfect but still cute thought right?

Here's what you'll need:

Cupcakes (check out other posts to choose a recipe and use black liners)
White Icing (This is a yummy icing that would be perfect!)
Royal Icing (Royal Icing)
Pink sprinkles
Wax paper
Piping bags
Hot pink and black food coloring gel
Small decorating tips
Thin paintbrush or toothpick
Skull Template

How to:

1. Tape template to a cutting board or sturdy movable surface and cover with wax paper.  Tape the wax paper down so that it does not move

2. Separate the royal icing to color it (3/4 c. white, 3/4 c. black, 1/4 c. pink).  You will have to add a lot of hot pink and black gel to the icing to get it the right color. (Keep icing covered until use because royal icing will dry out)

3. Add the icing to the piping bags

4. Begin to outline the skull and outer circle with the black icing (#2 tip), then outline with inside of the bow and fill in the eyes and nose ( #1 tip)

5. Wait for the black icing to harden and use the pink icing to fill in the bows (#1 tip)

6. Use white icing to fill in the inner part of the skull

7. Fill in the outer part of the skull with white icing (I found it was very hard to fill in without smearing the color until I waited for the icing to dry.)

8. Paint on the eye lashes with a fine brush or toothpick

9. When the icing is completely dry, you can remove the skullettes off of the wax paper

10. Before placing the skullette toppers on the cupcakes, roll the iced cupcakes in pink sprinkles

11. Place the toppers carefully on the cupcakes

12. ENJOY!!!

Tuesday, June 5, 2012

Saint Patrick's Day Sugar Cookies and Cookie Pops


How fun are these??? Make them for any occassion!


Adapted from Allrecipes.com

Ingredients:
2 3/4 cup all purpose flour
1 tsp baking soda
1/2 tsp baking powder
1 cup butter softened
1 1/2 cups white sugar
1 egg
1 tsp vanilla

Icing:
Confectioners Sugar
Milk
Vanilla

Directions:
1. Preheat oven to 375 degrees

2. Mix together butter and sugar until smooth

3. Beat in egg and vanilla

4. Slowly add flour, baking powder, and baking soda

5. Roll out dough (1/4 in) and cut out shapes with a cookie cutter (press lollypop sticks into the cookies for cookie pops)

6. Bake 8-10 minutes or until golden brown

7. Cool completely before icing

8. Enjoy!!!

I use about 1 cup of confectioners sugar and VERY SLOWLY (LIKE A TABLESPOON AT A TIME) add the milk. I used about a 1/2 teaspoon of vanilla for flavoring and a drop of green food coloring.

Strawberries and Shortcakes


Wow, it has been a while! Too long! I have been so busy finishing up my Master's Degree that I have not been able to find the time to bake, much less blog. I am working 61 hours a week between my full time job as a social worker and my internship with the Community Services Board. I am going to school on Saturdays from 9am-6pm...so painful! But the bright side...(bright side? What the hell is so bright about class on Saturdays and no social life?)...I am almost done!

I miss the days of laying on the couch watching Lock Up on Fridays and Saturdays and the Food Network every other day of the week. (Those days have been replaced with writing papers and early bedtimes.)  When I saw these on Barefoot Contessa, I had to try them! They are so good...but more for the person who doesn't have a sweet tooth. If that's you, give them a try! 

Barefoot Contessa Strawberry Shortcakes Deconstructed

Ingredients:

2 cups all-purpose flour
Granulated sugar
1 tbsp baking powder
1 teaspoon salt
12 tbsp (1 1/2 sticks) cold unsalted butter diced
2 extra-large eggs lightly beaten
1/2 cup cold heavy cream
1 egg beaten with 2 tablespoons water or milk for egg wash
2 pints fresh strawberries, hulled and thickly sliced
2 tbsp Grand Marnier liqueur
Sweetened whipped cream (I made my own using heavy whipping cream, confectioners sugar, and vanilla)

Directions:

1. Preheat the oven to 400 degrees. Line a sheet pan with parchment paper.

2. Sift the flour, 2 tablespoons sugar, baking powder, and salt into the bowl. Add the butter and mix on low speed until the butter is the size of peas.

3. Combine the eggs and heavy cream in a measuring cup and, with the mixer still on low, add to the flour mixture. Mix until just combined. The dough will be sticky.

4. Dump the dough out onto a well-floured surface. Flour a rolling pin and roll the dough 1/2 to 5/8 inch thick. You should see lumps of butter in the dough. Dip a 2-inch plain round cutter in flour and cut 16 to 18 biscuits(I got 12).

5. Place on the sheet pan, brush the tops of the biscuits with the egg wash, and sprinkle with sugar. Bake for 15 to 20 minutes, until the tops are browned and the insides are fully baked.

6. Allow to cool.

7. Mix strawberries with 1/3 cup of sugar and the Grand Marnier in a medium bowl.

8. Serve strawberries and whipped cream with the shortbread on the side.

9. ENJOY!!!

Tuesday, March 20, 2012

Banana Split Cupcakes


My narcissistic boyfriend thinks he is the master of EVERYTHING...including cupcakes. Seriously, the boy has never browned hamburger meat, but suddenly nobody knows how to cook better than him. I don't get it. I am always staring at him in amazement over his arrogance...although it makes me laugh. He had a "much better idea" than I did about how to decorate BANANA SPLIT cupcakes. His idea was to top a banana cupcake with strawberries...Ummmm helloooooo! That would make a strawberry banana cupcake, not a banana split cupcake.... buttttttt I digress. HERE IS HIS CUPCAKE:

Note: I added the pretty strawberry on the side for photo purposes....

ANYWAY...

Lets get to the how to. For the banana cupcake recipe you must give credit to one of my favorite cupcake bloggers, Kristan, over at confessionsofacookbookqueen.com


For the icing and toppings I got a little creative, see below.

Banana Cupcakes:
1 box Duncan Hines French Vanilla Cake Mix
1 stick butter, melted
4 eggs
3/4 cup water
2 medium sized ripe bananas, mashed

Directions:

1. Preheat oven to 350 and line muffin tin

2. Beat all of the ingredients together

3. Pour into wells and bake for 15 minutes or until tops spring back when touched slightly

I made homemade vanilla whipped cream for the icing by beating 1 cup of heavy whipping cream on high speed until fluffy and light. I added about a teaspoon of vanilla and about 1 tablespoon of powdered sugar. I folded in crushed pineapple and finely chopped strawberries to taste.

I topped the whipped cream with a chocolate syrup, sprinkles, and a cherry!


ENJOY!!!!


Monday, March 5, 2012

Whoopie Pies


Mmmmmm Don't these look yummy??


What a weekend! So one of my best friends and sorority sister, Kaitlyn, came home from Austria last week to visit. Yea, Austria...she moved there for work. My friends are so fab! I'm super jeal! Anyway, we shopped all day on Saturday and had a super sexy photo shoot.....see for yourself! Sooo much fun!


We questioned if anyone actually wears these things for any event other than tacky hat day?? Then it hit me, I could see many of the Southern Baptist women who attend church with me praising the good Lord wearing one of these bad boys!
I was so tempted to buy one of these hats just in case I ever get the oppurtunity to attend the Kentucky Derby or some other glamourous event where I could pull it off. A few were actually cute....Example #1....

Example #2


Example #3


Ha got ya! So I was joking about Example #3...

Moving on...

I planned on making some banana split cupcakes last night, but I was CRAVING chocolate so I decide to try Whoopie pies. Yes, craving chocolate. I have been complaining about needing to get back into shape before bikini season, and I am devouraring Whoopie pies as we speak. Don't judge.

I had never tried Whoopie Pies before, but they seem to be becoming very popular so I gave them a shot.

They are one of my new favs! I love the moist cake-like cookie with the cream filling. Pair it with a glass of milk and HEAVEN! I recommend that you give these a try too!

This recipe is from http://www.foodnetwork.com/
Ingredients:
3 cups sugar
1 cup butter
4 eggs
1/2 cup vegetable oil
1 tablespoon vanilla extract
6 cups all-purpose flour
2 cups unsweetened cocoa powder
1 teaspoon baking powder
1 1/2 tablespoons baking soda
1 teaspoon salt
3 cups milk
Filling, recipe follows

Directions:

1. Preheat oven to 350 degrees F, or preheat a convection oven to 315 degrees F.

2. In a large bowl of an electric mixer, beat the sugar, butter, and eggs together until well combined. Add the oil and vanilla and beat again.

3. In a separate bowl, combine all of the dry ingredients. Add half of the dry mixture to the egg mixture and beat or stir to blend. Add 1 1/2 cups milk and beat again. Add the remaining dry mixture and beat until incorporated. Add the remaining 1 1/2 cups milk and beat until blended.

4. With a large spoon, scoop out 32 circles of batter onto a baking sheet. Bake for 10 to 12 minutes. Let cool.

5. Spread filling onto 16 circles and place remaining circles on top.

6. ENJOY!!

Filling:
1 1/2 cups shortening

3 cups confectioners' sugar

1 1/3 cups marshmallow topping

Dash salt

1 teaspoon vanilla extract

1/3 to 1/2 cup milk

In the bowl of an electric mixer, combine all ingredients except the milk and beat well. Add just enough milk to achieve a creamy consistency. Spread filling across cooled cookie circles.

*I halfed this recipe and it made 13 big Whoopie Pies*

That's my sweetie Nick. He doesn't even like Whoopie Pies, but he's a damn good sport.

Thursday, March 1, 2012

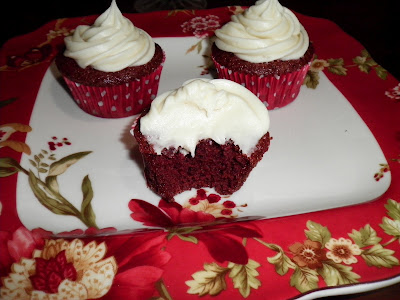
Red Velvet Cupcakes


It's hard to believe, but I have never had Red Velvet until I made these. My supervisor at work yesterday told me that I should make Red Velvet Cupcakes because "everyone likes Red Velvet". I didn't follow this recipe exactly after reading the reviews, so I have written my revisions next to the original recipe. And of course, this is Paula Deen's recipe. www.foodnetwork.com

The icing is TO DIE FOR! But...then again...I do LOVE icing. And as usual, I was eating it with a spoon...don't judge.

This cake was not as red as it will be if you follow the original recipe because I added a lot more cocoa powder then the original recipe called for. If you try them, let me know what you think!

Ingredients
2 1/2 cups all-purpose flour
1 1/2 cups sugar
1 teaspoon baking soda
1 teaspoon salt
1 teaspoon cocoa powder (I used about 6 or 7 tsps....yea a lot more than it called for)
1 1/2 cups vegetable oil (I used a little less than 1 cup)
1 cup buttermilk, room temperature
2 large eggs, room temperature
2 tablespoons red food coloring
1 teaspoon white distilled vinegar
1 teaspoon vanilla extract (I used 3 tsps of vanilla)

For the Cream Cheese Frosting:
1 pound cream cheese, softened
2 sticks butter, softened
1 teaspoon vanilla extract
4 cups sifted confectioners' sugar


Directions:

1. Preheat the oven to 350 degrees.

2. Line cupcake tin.

3. In a medium mixing bowl, sift together the flour, sugar, baking soda, salt, and cocoa powder.

4. In a large mixing bowl, beat together the oil, buttermilk, eggs, food coloring, vinegar, and vanilla with a handheld electric mixer.

5. Add the sifted dry ingredients to the wet and mix until smooth and thoroughly combined.

6. Divide the batter evenly among the cupcake tins about 2/3 filled.

7. Bake for about 20 to 22 minutes, turning the pans once, half way through. Test the cupcakes with a toothpick.

8. Remove from oven and cool completely before frosting.

9. ENJOY!!!

Cream Cheese Icing

1. In a large mixing bowl, beat the cream cheese, butter and vanilla together until smooth.

2. Add the sugar and on low speed, beat until incorporated.
Increase the speed to high and mix until very light and fluffy.


Tuesday, February 28, 2012

Mini Raspberry Cheesecakes


I know I'm on a roll with these mini cheesecakes, but who doesn't love cheesecake? I used one basic cheesecake recipe to make lots of different little cheesecakes. This was one of my favs! You could use fresh raspberries also, but the preserves are easy peasy and so good!


Cheesecake Recipe adapted from Annies-Eats http://annies-eats.com/
Ingredients:

For the Cheesecake
2 lbs. cream cheese, at room temperature
1½ cups sugar
Pinch of salt
1 tsp. vanilla extract
4 large eggs, at room temperature
Raspberry Preserves

For the crust:
1½ cups graham cracker crumbs
4 tbsp. unsalted butter, melted
3 tbsp. sugar

Directions:

1. Preheat the oven to 325˚ F.

2. Line cupcake pans with paper liners.

3. In a small bowl, combine the graham cracker crumbs, melted butter and sugar.

4. Stir together with a fork until well blended and all the dry ingredients are moistened.

5. Press 1 tablespoon of the mixture into the bottom of each cupcake liner.

6. Bake for 5 minutes.

7. Beat the cream cheese on medium-high speed in the bowl of an electric mixer until fluffy.

8. Beat in the sugar until smooth.

9. Beat in the salt and vanilla.

10. Beat in the eggs one at a time until mixed well.

11. Pour batter over the graham cracker crust until the well is about 2/3 full.

12. Place about 1/2 teaspoon of raspberry jam in several spots over the cheesecake.

13. Use a toothpick to marble the raspberry throughout the cheesecake.

14. Bake for 20-22 minutes.

15. Cool and chill before serving.

16. ENJOY!