Tuesday, January 29, 2013

Chocolate Fudge Cowgirl Cupcakes with Vanilla Buttercream

Wow...it's been so long!  Now that I have graduated and actually have some free time I hope to get back into baking and blogging (and hitting the gym).  It feels so good to finally (3 years later) have those three little letters behind my name, MSW!  Hopefully you'll be seeing a lot more of me!


So cute, right?


Our friends Rachael and Steven are bring a sweet baby girl into the world.  Seriously...how exciting!  Rachael is into barrel racing and riding horses, so when I saw these super cute cowboy hat and cowboy boot candy molds I had to buy them!  I knew they would be perfect to decorate some cupcakes to help us celebrate baby Charley!


These are chocolate cupcakes filled with hot fudge...YUM! 
(I used store bought ice cream fudge.  When I was done filling the cupcakes I could hardly put the spoon down.  Hello treadmill!)  Pick one of my chocolate cupcake recipes or use a box mix to make it simple.


I frosted these cuties with vanilla buttercream.  This is one of my favorite buttercreams yet!  I added pink and  burgundy gel food coloring to get this color.
Adapted from Foodnetwork.com

Ingredients:
-3 cups confectioners sugar
-1 cup softened butter
-1 tsp vanilla
-2 tbsp heavy whipping cream

Directions:
-Mix together sugar and butter until well blended
-Add vanilla and whipping cream and continue to beat until smooth (you may need to add more whipping cream to get the consistency right)

Enjoy!

I almost forgot to show you the cute tutu that I made for Baby Charley!  For the record, I am a Redskins fan, Hail!

Thursday, December 6, 2012

Magic Lemon Merinque Pie

Seriously guys, this is the perfect pie to whip up and take with you all to those holiday parties/dinners when you don't want to show up empty handed.  This pie is so simple to make and you only need a few ingredients!  I made it to take to my friend's house for Thanksgiving Dinner, and of course it was a hit! Try it, you'll love it and so will everyone else!


Adapted from Home Cooking with Trisha Yearwood-She's country y'all.  You know the gal can cook!

Ingredients:
Graham Crack Pie Crust
 -1 1/2 cups fine graham cracker crumbs
 -1/2 cup sugar
 -1/4 cup butter, melted

Filling
 -1 can (14 0z.) sweetened condensed milk
 -1/2 cup fresh squeezed lemon juice (I used about 2 1/2 lemons)
 -1 tsp. grated lemon zest
 -3 large egg yolks (save the whites for the meringue)

Meringue
 -3 large egg whites
 -1/4 tsp cream of tartar
 -1/4 cup sugar

Directions:
1. Preheat oven to 325 degrees
2. For the crust: In a mixing bowl, stir together the graham cracker crumbs and sugar until combined. Stir in the melted butter. Press the mixture firmly into a 9-inch pie plate.
3. For the filling: In a medium bowl, mix the condensed milk, lemon juice, zest and egg yolks.  Pour the mixture into the crust.

4. For the meringue: Beat the egg whites and cream of tartar in a medium bowl with an electric mixer until soft peaks form, then add the sugar and whip until peaks are stiff.
5. Spread the meringue over the pie and seal to the edge of the crust.
6. Bake until the meringue browns slightly, 15 to 20 minutes. Chill for at least 2 hours before serving.
7. ENJOY!!!!

Wednesday, October 3, 2012

Peanut Butter Doggie Treats

Peanut Butter Doggie Treats!


This is Willis. 

Willis was an only child before my boyfriend begged for a pitbull puppy.  I did not want another dog, but Nick said "Candace, my heart just felt different when I held that puppy."  How could I say no to that?  I couldn't.  So now Willis has a little brother.  They have become best friends. 


They do everything together.


Two peas in a pod.


How cute are they?


Cuddling.


I'm always baking for the loved ones in my life...so I figured it was time to bake for my little boys.

Peanut Butter Dog Treats

Ingredients:
1 1/2 cups whole wheat flour
1 1/2 cups white flour
1/2 cup peanut butter (all-natural or organic)
1 cup water
2 tablespoons oil

How to:
1. Preheat the oven to 350 F
2. ix oil, peanut butter and water
3. Add flour gradually forming a dough. Knead dough into ball and roll to 1/4 in thickness
4. Cut dough with bone shaped cookie cutters or cut the dough into strips
5. Place on an ungreased cookie sheet (I baked mine on wax paper over a cookie sheet)
 6. Bake at 350 F for 20 minutes
Icing is made from flour and water.

Snoop isn't little anymore...

Tuesday, October 2, 2012

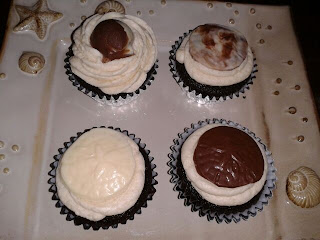
Chocolate Cupcakes with Coffee Liqueur Cream Filling and Coffee Buttercream

I made these bad boys to go along with the double vanilla cupcakes for Chad and Rebecca's wedding.  Seriously...what could be better than booze and cupcakes?  Exactly.

Try them.  I know you will love them.  They're like a party in your mouth.

As Chad's daddy said..."You gotta watch those cupcakes.  They have high test in them!"


I made the candies on top of the cupcakes using candy melts...perfect decoration for a beach themed wedding!


Adapted from Paula Dean

Ingredients:
2 1/4 cups all-purpose flour
2 cups sugar
3/4 cup unsweetened cocoa powder
1 1/2 teaspoons baking soda
1 teaspoon baking powder
1/2 teaspoon salt
1 cup vegetable oil
1 cup strong brewed coffee, cooled
3 large eggs
1 (8-ounce) container sour cream
1 teaspoon vanilla extract

How to:
1. Preheat the oven to 350 degrees 
2. Line muffin pans with paper liners
3. In a large bowl, whisk flour, sugar, cocoa powder, baking soda, baking powder, and salt. Add oil, coffee, and eggs. Beat at medium speed with an electric mixer until smooth. Mix in the sour cream and vanilla
4. Spoon the batter evenly into prepared muffin cups, filling each 2/3 full
5. Bake until a toothpick inserted in center comes out clean, for 16 to 18 minutes
6. Allow them to cool before icing
7. Cut centers of cupcakes out in a cone shape with a sharp knife or use a cupcake corer (I have one but it was lost in the black hole that I call my baking cabinet, it cores cupcakes super fast!) Set these pieces aside so that you can use them to cover the filling
8. Insert Coffee Cream Filling into the cupcake (this can be done by putting the cream into a piping bag with a small tip)


9. Cut the tops off of the pieces that you removed from the center of the cupcake in order to cover the cream filling, like so...


10. Ice the cupcakes and ENJOY!

Coffee Buttercream Icing:

1/2 cup butter, softened
3 cups confectioners sugar
1/4 cup strong brewed coffee, cold


In a medium bowl, beat the butter at medium speed with an electric mixer until creamy. Gradually add the confectioners' sugar, beating until smooth, then gradually beat in the coffee.

Chocolate Coffee Cream Filling:

3 oz. package cream cheese, softened
1/4 cup coffee-flavored liqueur (I used Kahlua. One air plane bottle is the exact amount you will need.)
1 (8-ounce) container frozen chocolate flavored whipped topping, thawed

In a small bowl, whip the cream cheese at medium speed with an electric mixer until smooth. Slowly add the liqueur and fold in the whipped topping. Cover and chill.


Friday, September 14, 2012

Double Vanilla Wedding Cupcakes

A slice of cake never made anyone fat. You don't eat the whole cake. You don't eat a cake every day of your life. You take the cake when it is offered because the cake is delicious. You have a slice of cake and what it reminds you of is someplace that's safe, uncomplicated, without stress. A cake is a party, a birthday, a wedding. A cake is what is served on the happiest days of your life.” ~Jeanne Ray 


I am one of those who cries at weddings.  Even when I attend weddings as a "plus 1" for people I don't really know, I cry.  I'm such a loser.

My friends' Chad and Rebecca were married last weekend.  You know Chad and Rebecca, they are the couple with the cute little boy who I made the Elmo and Cookie Monster cupcakes for.  Remember?


Anyway, I made cupcakes to dress up the cake table.  They were so cute and soooo delicious!  They looked absolutely perfect placed around the cake!  I was pleased.


My nickname is now "cupcake".  I'm okay with "cupcake".  Let's face it.  I have been called worse....


I made a vanilla cupcake with this Icing .  I definitely recommend that you try it.  It's A.M.A.Z.I.N.G!  And it would be good with a chocolate cake also! 


I used candy melts to make the little shells and sand dollars placed on the cupcakes.  I was pleased at how they turned out!


Here's the happy couple!  And Cavern enjoying his third Cupcake!


This was such a beautiful ceremony!  And yes, I cried....of course I cried. 

I had to share this picture of Kaden during the prayer.  How adorable is this picture?


And this is Kaden and I before the wedding and after he lost his first tooth! 


 Ok, I'm getting off subject.  Later!

Friday, September 7, 2012

Monster High Skullette Cupcakes

I know that I have been MIA.  I am working full time and also doing an internship for an additional 21 hours a week and taking a class at VCU.  I have no time for baking much less blogging.  The bright side...I graduate December 8th!  I haven't had a cupcake since the summer semester started and it seriously depresses me. 

I made these cupcakes a couple of months ago, but have had no time to share them with you guys.  Finally, here they are!

I received two invitations for birthday parties for little girls turning five around the same time.  Both were having Monster High Birthday parties.  I have to admit, I had no freaking clue what the hell Monster High was.  For those of you who do not know them, meet the Monster High girls...


My friend Ashley asked if I would make Monster High cupcakes for her daugther's birthday and sent me a link to Mighty Morgan's blog over at Mighty Delighty.  I was flattered..but SERIOUSLY doubting my ability to make these cupcakes.  Ashley served as my little cheerleader making statements like "I know you can do them" and "you're the best".    How could I say no to that???  Flattery will get you EVERYWHERE!

I had NO IDEA what I was getting myself into!  These were very time consuming and hard to make but I understand Makenna really enjoyed them!  And Oh.Em.Gee how cute are these?!?!  I really tested my abilities with these!  Check em out!


Ok, so I know they are not perfect but still cute thought right?

Here's what you'll need:

Cupcakes (check out other posts to choose a recipe and use black liners)
White Icing (This is a yummy icing that would be perfect!)
Royal Icing (Royal Icing)
Pink sprinkles
Wax paper
Piping bags
Hot pink and black food coloring gel
Small decorating tips
Thin paintbrush or toothpick
Skull Template

How to:

1. Tape template to a cutting board or sturdy movable surface and cover with wax paper.  Tape the wax paper down so that it does not move

2. Separate the royal icing to color it (3/4 c. white, 3/4 c. black, 1/4 c. pink).  You will have to add a lot of hot pink and black gel to the icing to get it the right color. (Keep icing covered until use because royal icing will dry out)

3. Add the icing to the piping bags

4. Begin to outline the skull and outer circle with the black icing (#2 tip), then outline with inside of the bow and fill in the eyes and nose ( #1 tip)

5. Wait for the black icing to harden and use the pink icing to fill in the bows (#1 tip)

6. Use white icing to fill in the inner part of the skull

7. Fill in the outer part of the skull with white icing (I found it was very hard to fill in without smearing the color until I waited for the icing to dry.)

8. Paint on the eye lashes with a fine brush or toothpick

9. When the icing is completely dry, you can remove the skullettes off of the wax paper

10. Before placing the skullette toppers on the cupcakes, roll the iced cupcakes in pink sprinkles

11. Place the toppers carefully on the cupcakes

12. ENJOY!!!